### Live Demo
If you are in a hurry, check out our official **[live demo](https://stackblitz.com/edit/nuxt-3-sdk-demo?file=pages/index.vue)** on Stackblitz.
## 🚀 Usage
_Note: This module is for Nuxt 3. [Check out `@storyblok/nuxt-2` for Nuxt 2](https://github.com/storyblok/storyblok-nuxt-2)_.
> If you are first-time user of the Storyblok, read the [Getting Started](https://www.storyblok.com/docs/guide/getting-started?utm_source=github.com&utm_medium=readme&utm_campaign=storyblok-nuxt) guide to get a project ready in less than 5 minutes.
### Installation
Install `@storyblok/nuxt`:
```bash
npm install @storyblok/nuxt
# yarn add @storyblok/nuxt
```
Add following code to modules section of `nuxt.config.js` and replace the accessToken with API token from Storyblok space.
```js
import { defineNuxtConfig } from "nuxt";
export default defineNuxtConfig({
modules: [
["@storyblok/nuxt", { accessToken: "" }]
// ...
]
});
```
You can also use the `storyblok` config if you prefer:
```js
import { defineNuxtConfig } from "nuxt";
export default defineNuxtConfig({
modules: ["@storyblok/nuxt"],
storyblok: {
accessToken: ""
}
});
```
> ⚠️ This SDK uses the Fetch API under the hood. If your environment doesn't support it, you need to install a polyfill like [isomorphic-fetch](https://github.com/matthew-andrews/isomorphic-fetch). More info on [storyblok-js-client docs](https://github.com/storyblok/storyblok-js-client#fetch-use-polyfill-if-needed---version-5).
#### Options
When you initialize the module, you can pass all [_@storyblok/vue_ options](https://github.com/storyblok/storyblok-vue#storyblok-api) plus a `bridge` option explained in our [JS SDK Storyblok bridge section](https://github.com/storyblok/storyblok-js#storyblok-bridge) and a `enableSudoMode` option to define your own plugin (see below).
> If you want to use Storyblok inside `nuxt-devtools` you can use the option `devtools`, if enabled, make sure to have installed the @nuxt/devtools module and enable it on your nuxt config.
```js
// Defaults
["@storyblok/nuxt", {
{
accessToken: "",
bridge: true,
devtools: true,
apiOptions: {}, // storyblok-js-client options
}
}]
```
**Define your own plugin**
While the recommended approach covers most cases, there are specific instances where you may need to use the `enableSudoMode` option and disable our plugin, allowing you to incorporate your own.
```js
// nuxt.config.ts
modules: [
[
"@storyblok/nuxt",
{
accessToken: "",
enableSudoMode: true
}
]
];
```
To include additional functionalities in the SDK's `apiOptions`, such as custom cache methods, you can implement the following solution inside the plugins folder (autoimported):
```js
// plugins/storyblok.js
import { StoryblokVue, apiPlugin } from "@storyblok/vue";
export default defineNuxtPlugin(({ vueApp }) => {
vueApp.use(StoryblokVue, {
accessToken: "",
apiOptions: {
cache: {
type: "custom",
custom: {
flush() {
console.log("all right");
}
}
}
},
use: [apiPlugin]
});
});
```
#### Region parameter
Possible values:
- `eu` (default): For spaces created in the EU
- `us`: For spaces created in the US
- `cn`: For spaces created in China
Full example for a space created in the US:
```js
["@storyblok/nuxt", {
{
accessToken: "",
apiOptions: {
region: "us"
}
}
}]
```
> Note: For spaces created in the United States or China, the `region` parameter **must** be specified.
### Getting started
### 1. Creating and linking your components to Storyblok Visual Editor
To link your Vue components to the equivalent one in your Storyblok space:
- First, you need to load them globally adding them to the `~/storyblok` directory. It's important to name them with Pascal case in your code `ExampleComponent.vue` and with a hyphen inside your Storyblok space `example-component`, so they will be imported automatically.
Otherwise, you can set another directory and load them manually (for example, by [using a Nuxt plugin](https://stackoverflow.com/questions/43040692/global-components-in-vue-nuxt)).
> Take into account that if you name a component inside the `storyblok` folder the same as another in the `components` folder, it won't work properly. Tip: Keep the components in your Nuxt project with different names.
- For each components, use the `v-editable` directive on its root element, passing the `blok` property that they receive:
```html
```
- Finally, use `` which is available globally in the Nuxt app:
```html
```
> The `blok` is the actual blok data coming from [Storblok's Content Delivery API](https://www.storyblok.com/docs/api/content-delivery/v2?utm_source=github.com&utm_medium=readme&utm_campaign=storyblok-nuxt).
### 2. Getting Storyblok Stories and listen to Visual Editor events
#### Composition API
The simplest way is by using the `useAsyncStoryblok` one-liner composable (it's autoimported) and passing as a first parameter a name of your content page from Storyblok (in this case, our content page name is `vue`, by default you get a content page named `home`):
> If you want to know more about versioning `{ version: "draft" /* or "publish" */ }` then go to the section [Working with preview and/or production environments](#3-working-with-preview-andor-production-environments)
```html
```
Which is the short-hand equivalent to using `useStoryblokApi` inside `useAsyncData` and `useStoryblokBridge` functions separately:
```html
```
> Using `useAsyncData` SSR and SSG capabilities are enabled.
#### Rendering Rich Text
You can easily render rich text by using the `renderRichText` function that comes with `@storyblok/nuxt` and a Vue computed property:
```html
```
You can also set a **custom Schema and component resolver** by passing the options as the second parameter of the `renderRichText` function:
```html
```
### 3. Working with preview and/or production environments
Remember that the bridge only works using `version: 'draft'` and the _Preview Access Token_.
For the production site, NOT used as a preview for content editors, `version: 'published'` and _Public Access Token_ should be used.
> If you're using production as a preview for marketeers and your public site, you will need a plugin to handle different .env variables, or versions using the _Preview Access Token_, checking if you are inside Storyblok or not. For example, something like `if (window.location.search.includes(_storyblok_tk[token]=)`.
Check the official docs on how to [access different content versions](https://www.storyblok.com/docs/guide/essentials/accessing-data#content-versions).
### API
#### useAsyncStoryblok(slug, apiOptions, bridgeOptions)
(Recommended Option) Use [`useAsyncData`](https://v3.nuxtjs.org/api/composables/use-async-data/) and [`useState`](https://v3.nuxtjs.org/api/composables/use-state) under the hood for generating SSR or SSG applications.
Check the available [apiOptions](https://github.com/storyblok/storyblok-js-client#class-storyblok) (passed to `storyblok-js-client`) and [bridgeOptions](https://www.storyblok.com/docs/Guides/storyblok-latest-js?utm_source=github.com&utm_medium=readme&utm_campaign=storyblok-nuxt) (passed to the Storyblok Bridge).
#### useStoryblok(slug, apiOptions, bridgeOptions)
It could be helpful to use `useStoryblok` instead of `useAsyncStoryblok` when we need to make client-side requests, for example, getting personalized data for a logged user.
Check the available [apiOptions](https://github.com/storyblok/storyblok-js-client#class-storyblok) (passed to `storyblok-js-client`) and [bridgeOptions](https://www.storyblok.com/docs/Guides/storyblok-latest-js?utm_source=github.com&utm_medium=readme&utm_campaign=storyblok-nuxt) (passed to the Storyblok Bridge).
#### useStoryblokApi()
Returns the instance of the `storyblok-js-client`.
#### useStoryblokBridge(storyId, callback, bridgeOptions)
Use this one-line function to cover the most common use case: updating the story when any kind of change happens on Storyblok Visual Editor.
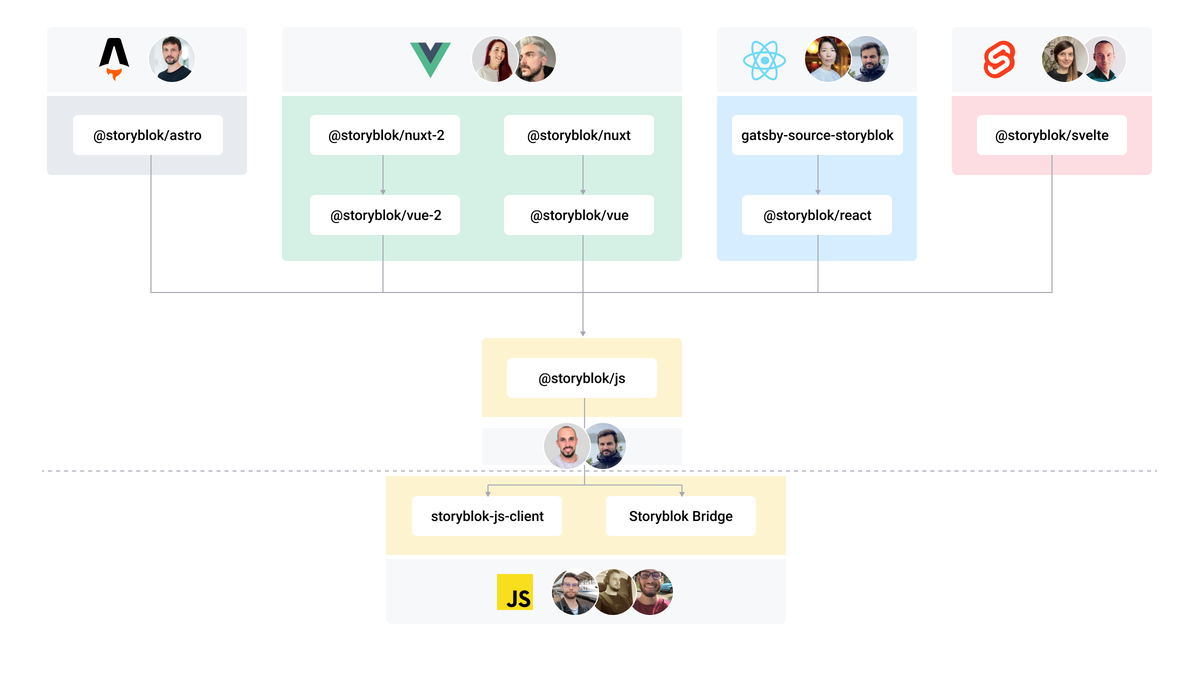
## The Storyblok JavaScript SDK Ecosystem
## 🔗 Related Links
- **[Live Demo on Stackblitz](https://stackblitz.com/edit/nuxt-3-sdk-demo?file=pages%2Findex.vue&terminal=dev)**
- **[Nuxt.js Hub](https://www.storyblok.com/tc/nuxtjs?utm_source=github.com&utm_medium=readme&utm_campaign=storyblok-nuxt)**: Learn how to develop your own Nuxt.js applications that use Storyblok APIs to retrieve and manage content;
- **[Storyblok & Nuxt.js on GitHub](https://github.com/search?q=org%3Astoryblok+topic%3Anuxt)**: Check all of our Nuxt.js open source repos;
- **[Storyblok CLI](https://github.com/storyblok/storyblok)**: A simple CLI for scaffolding Storyblok projects and fieldtypes.
## ℹ️ More Resources
### Support
- Bugs or Feature Requests? [Submit an issue](/../../issues/new);
- Do you have questions about Storyblok or you need help? [Join our Discord Community](https://discord.gg/jKrbAMz).
### Contributing
Please see our [contributing guidelines](https://github.com/storyblok/.github/blob/master/contributing.md) and our [code of conduct](https://www.storyblok.com/trust-center#code-of-conduct?utm_source=github.com&utm_medium=readme&utm_campaign=storyblok-nuxt).
This project use [semantic-release](https://semantic-release.gitbook.io/semantic-release/) for generate new versions by using commit messages and we use the Angular Convention to naming the commits. Check [this question](https://semantic-release.gitbook.io/semantic-release/support/faq#how-can-i-change-the-type-of-commits-that-trigger-a-release) about it in semantic-release FAQ.





